Sunday, August 12, 2012

First Coat Of POR-15 On The Engine Bay

We had one leftover can of partially used black POR-15 from when we painted the interior and t-tops. Jonathan unsealed the can and it was fine. He used one of our fabulous dauber stirring sticks and stirred the paint for quite a while to make sure it was completely mixed. 


Emptying The Engine Bay, The Conclusion

We got started at 9:00AM this morning. Jonathan decided he wanted to try to remove the tie rods and the rest of the steering linkage. He saw online that you can use the Pitman puller to separate the ball joints. This sounded like a better idea than what we were doing before, so we gave it a try.

Jonathan first had to remove the cotter pin and the retaining nut. They were very dirty, so he had to do a lot of scrubbing with the wire brush to even see what he was working with.


Saturday, August 11, 2012

The Engine Bay Is Empty And Prepped!

Here is what the engine bay looked like when we returned from lunch:

Passenger side:


Emptying The Engine Bay, Part 10

This morning we started at 8AM. Jonathan got out the rubber mallet and the pickle fork (from the ball joint and tie rod kit) and started banging away.


Friday, August 10, 2012

Emptying The Engine Bay, Part 9

I had it all planned. After work Jonathan and I were going to swing by the hardware store to buy a ball joint and tie rod kit to remove the steering linkage. Then we were going to get started right away on KITT. We would remove the last items in the engine bay and probably even get the engine bay cleaned and degreased. Then, after all that hard work, we would have a pizza for a late dinner.

I am delusional.

It all started as planned. We went the hardware store immediately after work and bought the ball joint and tie rod kit.


Thursday, August 9, 2012

Emptying The Engine Bay, Part 8

I had to go into work early today and so I got off early. I decided to dive right into removing the brake and fuel lines from the engine bay. First I worked on loosening all the line brackets in the engine bay and then worked my way along the underbody. The following pictures outline the path the lines take from the engine bay along the underbody. 


Wednesday, August 8, 2012

And He's Back In The Air

Tonight Sara and I cleaned and organized the garage and got KITT up on jack stands. I get off work early tomorrow and want to work on removing the brake lines and power steering gear.


Interior Samples Finally Arrived!

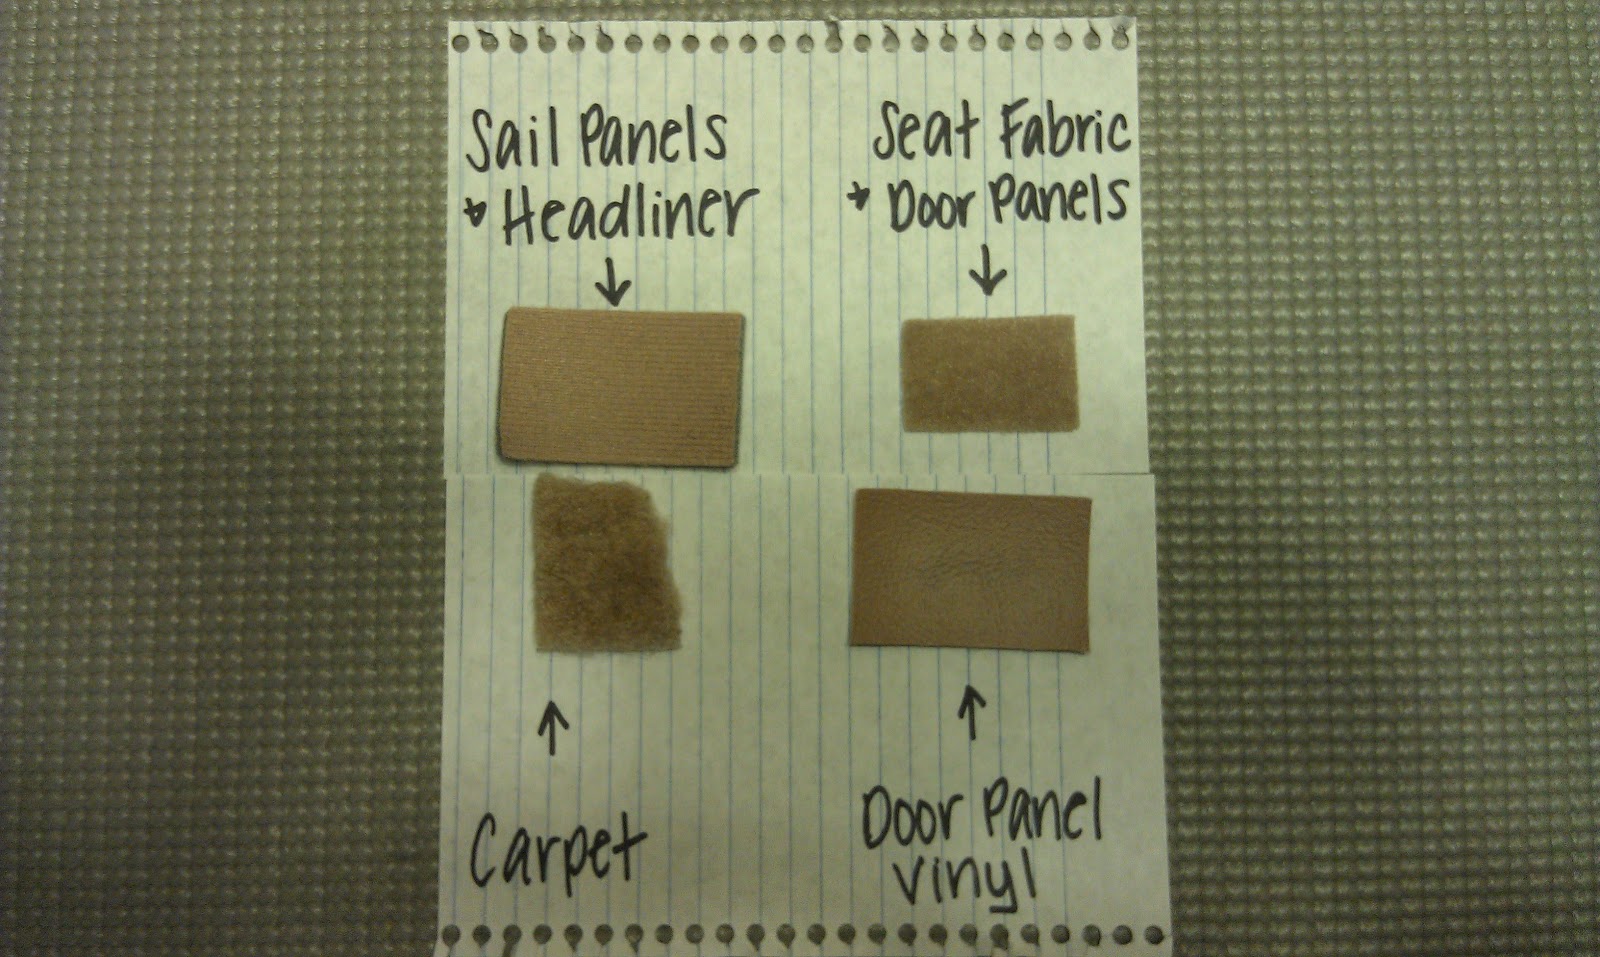
I ordered interior samples from 1A Auto on July 6th. They finally arrived today. We received 13 different interior samples in various shades of tan. Based on their match to each other and the similarity to the original carpet and material, we chose these four.

The sample labeled "Sail Panels & Headliner" is the material that will cover the t-top headliner, t-top shades, sun visors and sail panels. We chose #1755 Light Saddle.

The sample labeled "Seat Fabric & Door Panels" is the material that will cover the velour section of the door panel and is what we will submit to the upholsterer to match the seat fabric to. Ideally this fabric would be the same. We chose #P775E Sandstone.

The sample labeled "Carpet" is the carpet for the flooring of the car as well as the carpet that  will be used on the plastics. We chose #8384 Desert Tan. This carpet is actually sourced from Auto Custom Carpets.

The sample labeled "Door Panel Vinyl" is the vinyl that will appear just on the door panels. We chose #90022 Palomino Sierra.

We took the following pictures below in various lighting conditions. (Note: the dark spot in the middle of the "Door Panel Vinyl" sample is actually bleed-through from the permanent marker 1A Auto used to write the number on the back.)

Indoor compact fluorescent lighting (warm):


Tuesday, August 7, 2012

Emptying The Engine Bay, Part 7

I started this afternoon by draining and removing the master cylinder. I still have to remove the brake lines, but I need to get the car up in the air to do that.


Sunday, August 5, 2012

Emptying The Engine Bay, Part 6

Sara was running some errands while I worked on the engine bay this afternoon. When she returned home she helped me remove a few more things before we called it a day.

We removed both side signal marker lights.

This is the driver side signal marker light.


Emptying The Engine Bay, Part 5

This afternoon I worked on removing the rest of the wiring harness. Basically all that was left was the headlight harness. These three pictures show how the headlight harness was routed.


Painting The Firewall With POR-15, Part 2

We waited 2 1/2 hours, then went back out to the garage to apply the second coat of POR-15. I unsealed the can and mixed the paint with my newly-fashioned dauber turned paint stick.


Painting The Firewall With POR-15, Part 1

Here are the before shots of the firewall and the two inner areas below where the speaker mounts and behind the door jam. Sara worked on the firewall and I worked on the two inner areas.


Emptying The Engine Bay With Sara

After we decided to wait on the POR-15 until tomorrow morning, Jonathan started back in the engine bay. The first thing he removed was the positive battery lead.


Saturday, August 4, 2012

Prepping For POR-15, Part 2

Sara and I worked on removing the seam sealer from the lower firewall tonight.

Driver side with seam sealer intact:


Prepping For POR-15

This is the area I prepped for POR-15 today. It is the inner area below where the speaker mounts and behind the door jam. First I vacuumed the loose dirt and gravel from this area, then used a rag with Marine Clean to wipe it down. I followed this with a wire brush and then repeated with the Marine Clean. After it was dry I vacuumed it out again.

Friday, August 3, 2012

Back To Working On KITT

With the extreme temperatures we have had lately we have not worked on KITT as much as I would have liked. Tonight there was a major cool down following a brief storm and we were able to get back to work on KITT again.

I want to continue work on putting POR-15 on the firewall and the rest of the interior spots that we did not get to the first time. I started tonight by removing the brake and accelerator pedals.


Center Console And Door Sills

My center console was pretty much trashed by the previous owner trying to remove it without knowing how, so I have been in search of a good replacement. I found someone that had one and it arrived this week. As a bonus it had the radio plate included and it is in great shape. I intend to repaint these a matte black so everything looks like new.


Wednesday, August 1, 2012

My 24K Gold Knight's Head Arrived!

Well, not exactly...

I found the perfect knight's head pieces at Target and with a little gold spray paint I think they look pretty convincing. One for the garage and one for my desk!


KITT MiniMate And A Comic Con Exclusive

More Knight Rider purchases :)

A Toys R Us exclusive KITT MiniMate